
One of the most common frustrations with Remote Desktop is that it always launches in full-screen.
The moment you connect, it takes over your entire monitor, leaving you with no space to multitask or switch between apps on your local desktop.
On top of that, running your RDP at a high desktop resolution can eat up bandwidth and make the connection feel slower than it needs to be. The bigger the size of the window, the more resources it consumes, and this can impact speed.
If this sounds familiar, you’re not alone—and you don’t have to deal with this issue anymore. Many users often need to change the resolution of Remote Desktop to improve performance or adjust the setup for a more convenient experience.
In this tutorial, we’ll walk you through how to change the screen resolution in three simple steps.
You’ll also learn how to save your settings permanently so you don’t have to adjust them every time you log in.
If you prefer watching instead of reading, we have also explained the full process in a short YouTube video you can check out.
How to Change RDP Screen Resolution On Your Windows Computer
Step-1: Open the Remote Desktop Connection App.
On your computer, go to the search bar at the bottom left of your taskbar.
Type in either “remote desktop” or the command “mstsc” and you’ll see an application called Remote Desktop Connection.
Click on it to open.

Step-2: Access the Display Settings.
Once the remote desktop window opens, you’ll notice a small button at the bottom left that says “Show Options.”
Note: By default, Windows keeps most of the advanced settings hidden, so clicking on this expands the window and gives you access to more controls.

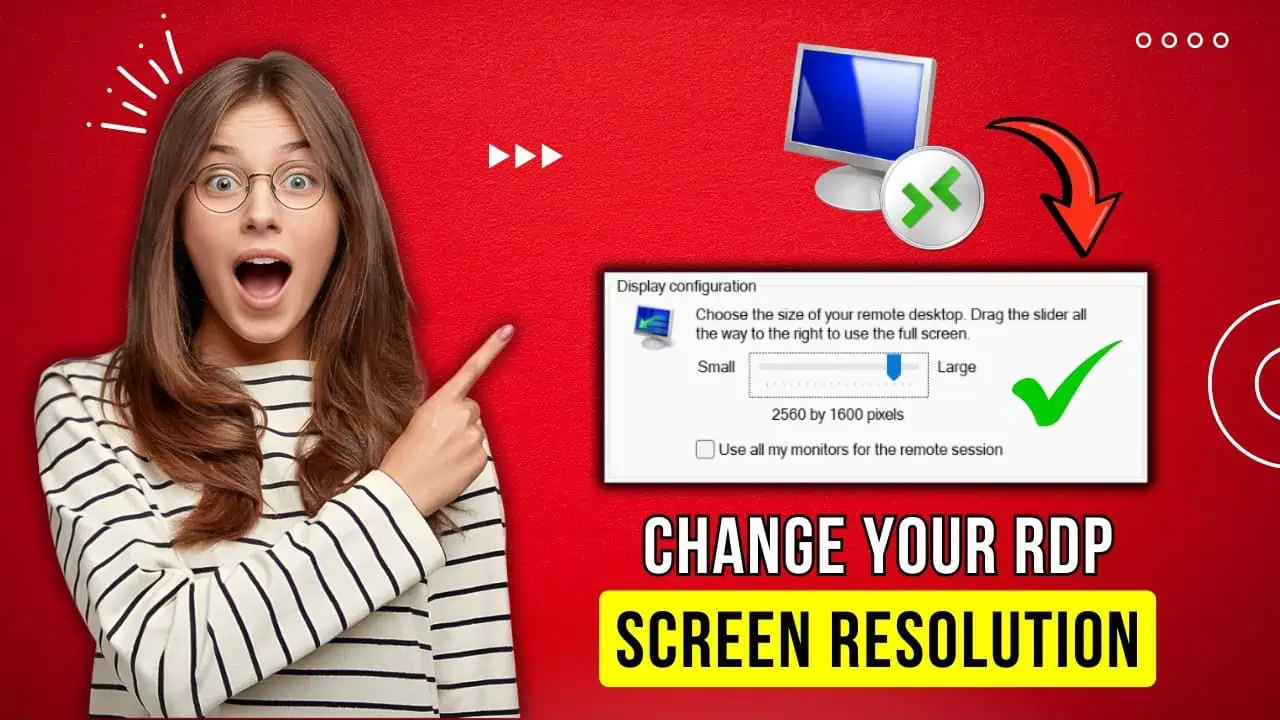
Step-3: Adjust the Screen Resolution.
After expanding the options, go to the Display tab at the top.
Here, you’ll see a slider under the section called Display configuration.
This is where you can adjust and edit the remote desktop resolution for your RDP session.
Move the slider to the left if you want a smaller screen size that takes up fewer resources, or slide it to the right if you want a larger, more detailed custom view.
Once you’ve selected your preferred setup, simply click Connect.

That’s it! Your RDP session will now log in using the new resolution mode. This simple setup makes sure your display matches exactly how you want it.
How To Save The New Settings Permanently
If you don’t want to repeat these steps every single time you connect, you can save your customized RDP file so it loads automatically.
Here’s how:
1. Once you’ve adjusted the resolution in the Display tab, switch over to the General tab.
2. Under the section called Connection settings, click Save As.
3. Choose a name for your file, select a location to save it (Desktop is most convenient) and then click the Save button.
4. Once done, just double-click the saved RDP file, and it will connect directly to your server using the resolution you set earlier.
This saves you time and ensures consistency every time you log in via RDP.

A Special Offer Just For You
You’ve made it to the end of this guide, and as a thank-you, we’re giving you something we don’t share with just anyone: an exclusive 20% discount on your very first RDP server or upgrade.
All you need to do is head over to our website and use the code “20OFF” at checkout.
This discount is only available to the first 50 readers who use it. After that, it’s gone for good.
So hurry, make sure you act now, and secure your savings before it’s too late!
